Showing posts with label windows tricks. Show all posts
Saturday, November 24, 2012

How To find IP Address And DNS Information Of a Website Using Command Prompt


Domain name of a website is the key that uniquely identifies the website on the Internet. But in reality, a website has a uniqe IP address. When we type a domain name on the browser to access a website, it is converted to its IP address by DNS servers.

If you want to get the IP address information of a website, there are many online tools available. But you can also get all those information just by using command prompt(CMD).

Use following command
nslookup
This command is available on both windows and unix operating systems.

If you want to get only the IP address information of the website, follow these steps:

Open command prompt and type
nslookup website.com
See following Snapshot


One thing you must know that very few websites have dedicated IP address. If a website has dedicated IP address, this result will show same IP address for a specific website each time. But for other websites, it might vary.

To see the DNS records of the domain. You can use following command
nslookup -d website.com
See following results.


See the DNS records of the website. It has listed primary name server.


Saturday, August 4, 2012

How to Compress PNG Images


PNG image format is nice for better graphics and to take snapshots. It is a lossless compression image format so it gives us better image quality. But it comes with a drawback that it is bigger in size than jpeg. 


Read: Reduce JPEG Images Without Affecting Quality


If you have taken snapshots in PNG format, you will have to think about its size. Using PNG images in your documents and web pages will increase its size. So we need a tool which can reduce the size of PNG images. 


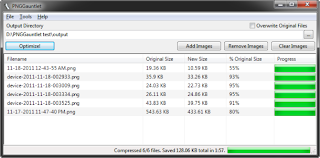
Recently i got to know about a nice tool called PNGGauntlet. It is a windows program that can help in reducing the size of PNG images. As i already mentioned that PNG is a lossless compression, so reduction in size is not going to affect the image quality in any way.
This tool requires Microsoft .NET Framework 4.0 installed in your computer. Download the tool and install it in your windows system.


Download Here

How to Compress PNG Images


Run the tool and drag all the images which you want to compress. You can set the output directory from the text bar at the top of the tool. You can also add images by clicking on the button "Add Images." After adding all the images which you want to compress, click on "Optimize" button at the top and wait for the tool to compress all the images. 


When i used the tool, it gave me surprising compression ratio and quality of images were unaffected. 


Try this nice tool and let us know your views via comments
Tuesday, July 31, 2012

Windows Search Filters and Query Operators


We all know about the search function of Windows. But Windows 7 comes with a powerful and advanced search feature which satisfies users with results. It allow users to search files based on file name and extension. But there are few things which is known to very less people. It comes with built in search filters and operators to refine our search results. 
In this post, i will explain all those search filters and query operators.


When we search something, it shows "add a search filter" and two options to filter. By modified date and By size. By using these available filters you can filter search results to show files created or modified on a specific date, or of a specific size. If you click on a filter, you will get a list of even more refined options.
When you click on by date by modified filter, you sill more option.
There are so many filters that are available in Windows search and not known to general users. These filters are:

Filter
Explanation
store:
Limit search to a specific folder location or data store. Ex.: store:desktopstore:outlook
kind:
Limit search to a specific type.
Ex.: kind:docskind:textkind:musickind:folderskind:email
name:
Find a file by its name. Ex.: name:”All this time”
date:
Search items based on dates.
Ex.: date:todaydate:yesterdaydate:this weekdate:past month
datemodified:
Search for file based on the modified date. Ex.: datemodified:05-05-2012
datetaken:
Searches for photos captured on a particular date: Ex.: datetaken:05-05-2012
datecreated:
Searches for a file created on a particular date. Ex.: datecreated:05-05-2012
deleted:
Search for deleted files in Recyble bin. Ex.: deleted:document.txt
ext:
Search for files of a specific extension. Ex.: ext:jpgext:mp3ext:pdf
authors:
Find files based on the username of the person who created it. Ex. authors:renji
artist:
Find songs by its artist. Ex.: artist:OneRepublic
genre:
Find songs by genre. Ex. genre:rock
album:
Find a particular album. Ex.: album:”Waking Up”
year:
Find songs by release year. Ex.: year:2012
track:
Find song by its track number. Ex.: track:12
orientation:
Find an image by its visual orientation. Ex.: orientation:landscape
height:
Find image with a specific height. Ex. height:1600
width:
Find image with a specific width. Ex. width:1600
tags:
Find files based on the metadata tags.
size:
Search for a file of a specific size or range of size. Ex. size:=1mb..16mbsize:large


You can combine these multiple search filters to get desired results.


Boolean Search Filters
Another way to get precise search results is by using Boolean Search filters. With this you can combine your search keyword using simple logic.
Filter
Explanation
AND
Finds files that contain multiple words, even if those words are not right next to each other.
Ex. “apple” AND “mango”
NOT
Find files that contain one word, but not the other. Ex. “apple” NOT “mango”
OR
Find files that contain either of the words. Ex. “apple” OR “mango”
Quotes
Find files that contain the exact phrase.Ex. “apple mango”
Parentheses
Find files that contain both words in any order. Ex. “apple” “mango”
> 
Find files that are more than or later than a certain value. Ex. date: >05/05/12
< 
Find files that are less than or earlier than a certain value. size: <16 MB
*
Using * (asterisk) can be handy when you don’t know the file name.
Ex. *.pdf.
This will give you all PDF files in a folder.
-
This lets you exclude items that begins with a word.
Just add – (dash) before the word you want to exclude. Ex. -letter


Friday, July 6, 2012

How to Disable System Tray On Windows


System Tray is a special feature on Windows System. It can be found at the bottom right corner of the windows. System Tray has few icons of programs which are running in background. Many times, these icons also allow users to change few settings of that program. But very less people use it. If you are one of those persons who want to remove it from system, a simple registry tweak can help you.


This tweak will work on all version of windows including Windows XP, Windows vista and Windows 7. 


Open regedit.exe in your system and follow the following path.
HKEY_CURRENT_USER\Software\Microsoft\Windows\CurrentVersion\Policies\Explorer
Here create a new 32-bit DWORD value in the right side with the value
Name: NoTrayItemsDisplay
Value: 1


Now restart your system to see the effect.


If you want to get your system try back, you can either remove this registry key or change its value to 0.
Note: By removing System try, you are only hiding system tray. All system try apps will continue run in the background. If you do not need any application running in the system  try, you can disble manually
Saturday, June 16, 2012

Recover Lost Files in Hard Disk, Memory Card and USB Drive


What if you have formatted your USB Drive? Or you have deleted an important file from your system of Pen drive? You can still recover these deleted files. There is a nice windows tool which is available for free. This tool is DiskDigger which is able to recover all type of lost documents and files.


DiskDigger is able to recover files from FAT (FAT12, FAT16, FAT32), NTFS, and exFAT partitions.
Download this tool and run in your system. You will see the list of drives available in the system. Select the drive from which you want to recover files. Then click on and next to start recovery process.

While recovering files, you can pause or stop the process at anytime. TO recover the file, click on Save. But there is no option to recover all files at once. You need to recover files on by one.
Sunday, June 10, 2012

How to Clear File Search History in Windows 7


Windows 7 has a built in search bar in windows explorer. You can search anything direct from there. When you click on th search bar, it also shows previously typed search queries (MRU). These are also used in autocomplete search. But sometimes we want to clear some search term from the history. There is no direct way is gven to remove search queries from the search. So here is a way with the help of registry editor.


To clear the entire Search MRU History from the registry directly, use these steps:


1. Click Start, type Regedit.exe and press ENTER.


2. Navigate to the following branch:


HKEY_CURRENT_USER --> Software --> Microsoft --> Windows --> CurrentVersion --> Explorer --> WordWheelQuery


3. Right-click the WordWheelQuery branch and choose Delete


4. Exit the Registry Editor.
Monday, June 4, 2012

Add Gmail to Windows 7 Taskbar


If you want to get instant notification from Gmail, you can setup for desktop notification. This works nice if you use Google Chrome browser. But for this, you must be logged in into your Gmail account.

If you do not want to open Google Chrome just to receive desktop notification, there is one more way to receive desktop notification of Gmail. If you are windows 7 user, you can add Gmail to your taskbar. It will show notification each time you will receive a new email and lets you see the message right on the Windows 7 taskbar thumbnail preview.

To add Gmail in task bar, download Kwerty Gmail Notifier and install in your system. After installation, login with your Gmail credentials. After that, you will see a Gmail envelop like icon in task bar. The number on the icon denotes the number of unread messages in your Gmail inbox.

When you take your mouse pointer over the icon, you will be able to read the messages right there in the thumbnail pop up box. You may use the arrows (left and right) to navigate through all messages. To read the full email, click on the icon between the arrows. It will open the email in your default browser.

This application also allows users to customize few settings. You can choose a sound or deactivate it completely as a desktop alert. You can also set an interval (in minutes between 1 and 60) for auto updating.

This is really a nice tool for windows users. But it asks for users' Gmail login credentials. This may be a bit risky. Although, there is no security breach have been reported, But we cannot guarantee anything though.
Monday, May 28, 2012

Add Applications to Firewall Blocklist via Drag and Drop With Firewall App Blocker


Windows Firewall is a special security feature of windows operating system which allow users to create packet filtering and protect system from malicious external resurces. Main function of windows firewall is restrict applications from sending or receiving unauthorize requests.


But this feature is usually ignored by users as it is hard to properly configure. Most of the users do not know what this feature do and how to use it. In windows 7, you can block a program in Firewall by following these steps:


1. Click the Windows orb and open the Control Panel 
2. Select System and Security
3. In the Windows Firewall section, select Allow a program through Windows Firewall
4. If the program you wish to block or unblock is not listed, you can click the Allow another program… button to add it.


I do not think that these steps are userfriendly.


But There is a tool called, Firewall App Blocker which allows users to add and remove application to Windows firewall block list just by drag and drop. This process is not only user-friendly, it also takes less time to manage block programs. When you want to block a program, drag this to the main interface of the tool. To unblock the program, select and delete.


The Advanced button brings up the Windows Firewall with Advanced Security window that allows you to apply Firewall policies and helps you configure Inbound Rules and Outbound Rules.


One more think to note that this tool does not provide any extra layer of security. It only allow users to access windows Firewall options easily. 


Download From Here
Thursday, May 3, 2012

How To Set Google Chrome As Default PDF Viewer In Windows


We all use Adobe Reader to open PDF files in our system. In case we do not have Adobe reader install in the system, most of us do not know what to do. But there is one more way by which we can read PDF files without need of Adobe Reader. Google Chrome web browser is a nice option to open and read PDF files. You can also set it as a default PDF viewer in windows system. Default PDF viewer means, all PDF files will open on the Chrome on double click. If you use Google Chrome for PDFs, you have one software less in your system. So this is a nice move.

Follow these steps to set Google Chrome as default PDF viewer

For windows 7 and Vists 
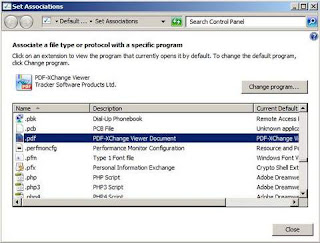
  • Click on Windows Button and then type “Associations” in the Run command box. You will see some Programs above listed. Choose the program that says “Change the file type associated with the file type extension”.
  • Now you will see a new window with all the file types and it’s associated programs to run it.
  • Search for PDF file type and double-click on it.
  • Choose Google Chrome from the list. If it is not listed, browse the path of Google Chrome.
  • Select it and click on OK to confirm the choice.


For windows XP
  • Click on Start Button and then move to My Computer.
  • Click on Tools menu and then select Folder Options.
  • Under File Types from tab, search and select PDF files.
  • Click on Change and select Google Chrome. If it is not listed there browse to Google Chrome.
  • Now Google Chrome is the default PDF file viewer in Windows XP too.

 You can also set Google Chrome as default PDF viewer by an alternate way. Right click on any PDF file and then select open with. Here select Google Chrome and then select always use selected program to open these kind of files. And then click on ok. PDF will open in Google Chrome. And after this every time you open a PDF, it will open in Google Chrome.
Wednesday, April 18, 2012

Remove Write Protection On Memory Cards and USB Drives


Many times we see some write protection error while using memory cards and USB drive. These errors may include write protection errors as you can see in the snap below.
This type of problem caused by virus. Few months back, i also faced the same problem. So i found a nice solution. 
There are two ways of doing this

  1. Using Registry Editor
  2. Using PenDrive repair tool
  3. Apacer Formatting Utility

Using Registry Editor

In this method, we will change some values in window registry. TO do this follow these steps:

  • Open Registry Editor by clicking on Star Menu --> Run. Now type “regedit” in run dialog box and you will see your Registry Editor opened.
  • Now Navigate to the following path in the registry editor:
    HKEY_LOCAL_MACHINE\SYSTEM\CurrentControlSet\Control\StorageDevicePolicies
  • If there is no StorageDevicePolicies key in your system then download this .Reg File and double click on it. Now restart your computer and it will add Storage DevicePolicies key in your windows registry.
  • Now double click on the WriteProtect and make its value 0 and than click OK.
  • Now close registry editor and restart your system.
  • Now plug your memory card or USB in and enjoy non write protected memory card.
Repair Usb drive using Pen drive repair
This is another solution of the problem in which your USB drive shows write protection error.  Download this tool and format your USB drive or memory card with th help of this. After formating your USB drive or memory card will start work fine.

Follow these steps and use this tool.
  1. Download Pen Drive repair from the above link and extract in your system.
  2. Plug in memory card or USB drive which you want to repair.
  3. Now run the tool and format the USB drive or memory card with the help of this.
  4. It will remove all the protection.

Apacer Formatting Utility
If you are unable to resolve your problem with the help of above methods, then you can try this nice tool Apacer Formatting Utility.
This also works in the same way Pen Drive repair works. Follow these steps and use it
  1. Download Apacer Formatting Utility to your computer and extract in your system.
  2. Plug in USB drive or memory card and then double click on the Start.bat. It will then format your USB drive.
  3. After formatting your card has been free from the write protection

Friday, March 30, 2012

How to run Google searches from addresss bar in Internet Explorer


In Internet Explorer, Bing is the default search. But Google search is better than Bing. But there is no option to change it and add Google as default search from address bar of Internet Explorer. So we have to go to Google.com to search from Google. But we can do some registry hacks to add Google as a default address bar search in Internet Explorer.


This cool internet Explore trick uses some windows registry modifications. Before trying these steps, backup your windows registry to avoid any problems.


Follow these steps to add Google searches to addresss bar in Internet Explorer
  • Click on start, and then on Run.
  • Type REGEDIT and press enter to open registry editor.
  • Now go to HKEY_CURRENT_USER -->Software -->Microsoft -->Internet Explorer -->SearchUrl
  • Double-click (Default) and type in the value:http://home.microsoft.com/access/autosearch.asp?p=%s
  • Click OK
  • Double-click provider and type in the value. If provider is not listed, make the key yourself.gogl
  • Now Click OK
  • Back on the left side, click once on Main and Double-click on AutoSearch and type in a value of 4.
  • Now Close the registry editor 

Start Internet explorer. And try a search direct from the address bar of internet explorer.


If you are not sure how to edit the registry, you can use the following code.


Windows Registry Editor Version 5.00


[HKEY_CURRENT_USER\Software\Microsoft\Internet Explorer\SearchUrl]
@=”http://home.microsoft.com/access/autosearch.asp?p=%s”
“provider”=”gogl”


[HKEY_CURRENT_USER\Software\Microsoft\Internet Explorer\Main]
“AutoSearch”=dword:00000004


Save the file as google.reg. 


To add these information to registry to Windows, click YES to enter the information into the registry.

Sunday, March 4, 2012

Keyboard Shortcuts for Windows 8 Consumer Preview


Microsoft has launched Windows 8 Consumer Preview 2 days back. It has gained lots of attention and got more than 1 million download in just 24 hours after the release. 


This new windows 8 is totally different from other previous version of windows. It is difficult for most of the users. But tablet and touch users will find it easy. Because it is mainly optimized for touch devices.


As i find that using this with the keyboard is really easy and fast. So you should remember some keyboard shortcuts. It supports all the previous shortcuts used in older version of windows. But there are many new added in this version. See the new keyboard shortcuts added in this version of the windows. And use all older windows shortcuts.


New hotkeys (Shortcuts) added in Windows 8 Consumer Preview
Key combinationFunction
Windows-SpaceSwitch input language and keyboard layout.
Windows-OLock device orientation.
Windows-,Temporarily peek at the desktop.
Windows-VCycle through toasts.
Windows-Shift-VCycle through toasts in reverse order.
Windows-EnterLaunch Narrator.
Windows-PgUpMove the Start Screen or a Metro-style application to the monitor on the left.
Windows-PgDownMove the Start Screen or a Metro-style application to the monitor on the right.
Windows-Shift-.Move the gutter to the left (snap an application).
Windows-.Move the gutter to the right (snap an application).
Windows-COpen the Charms bar.
Windows-IOpen the Settings charm.
Windows-KOpen the Connect charm.
Windows-HOpen the Share charm.
Windows-QOpen the Search pane.
Windows-WOpen the Settings Search app.
Windows-FOpen the File Search app.
Windows-TabCycle through apps.
Windows-Shift-TabCycle through apps in reverse order.
Windows-Ctrl-TabCycle through apps and snap them as they cycle.
Windows-ZOpen the App Bar.
Windows-/Initiate input method editor (IME) reconversion.
Windows-JSwap foreground between the snapped and filled apps.